Call to chat to our team Find your
nearest location

Product available in: Vic, Sa, Qld

SAVE WATER! SAVE TIME! SAVE MONEY!

  • Never clean your gutters again
  • Simple to fit, no screwing to roof
  • Works better, costs less, lasts longer
  • Unique cheese grate effect gradually attracts the water into your gutter
  • Ideal for fire prone areas
  • Delivers cleanest water, perfect for water tank installations

leafguardleafguard

APEX LEAF GUARD INSTRUCTIONS:

WARNING: Please use gloves; edge of material can be very sharp

Handy Hints:20 year

  • Take your time getting the first piece of Apex Leaf Guard to fit correctly and the rest of the job will be much easier.
  • use a sharp pair of tin snips or heavy duty sharp scissors
  • Use 12mm button head screws to fix each length of material together
  • No need to screw to the roof or gutter
  • Make sure the leaf guard is installed the correct way up (see sticker on each piece)
  • Do no rest your ladder on the gutter as it will squash the guttering and make it difficult to fit
  • Each strip is 190mm wide and can be trimmed and bent to fit the gutter, the necessary width you need may vary depending on the distance your roof protrudes over your guttering
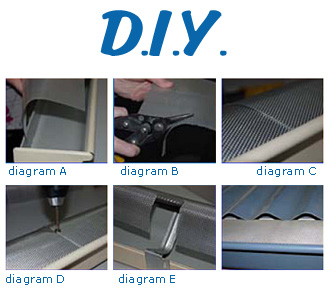
Step 1
Bend the strip into an “L” shape and place it into the bottom edge of the gutter (see diagram A)

Step 2
Gently tuck the leaf guard under the roof (tiled roof you can simply push the tiles back and then slide them back into place when the leaf guard is fitted). Spring the gutter forward and fit the front edge of the strip into the groove of the guttering

Step 3
If it will not fit into the groove of your guttering you will need to cut the excess off (usually about 10mm) until you get a neat fit (see diagram B) Please take your time to get your first piece right and the rest will be easy because you can bend and cut them all the same.

Step 4
With the next strip, once you have bent and trimmed to fit, cut 10mm out of the back of the strip so it will overlap on the top (see diagram C). Do the same with each subsequent piece and simply put a 12mm button head screw to hold each piece together (see diagram D).

Step 5
For guttering with internal brackets you will need to cut out a notch in the back of the strip (see diagram E) just lay the strip on the top of the gutter and mark where the brackets are and cut your notch.

Enquire about Product

ADVERSE CONDITIONS
If material is to be used within 1km of salt marine, industrial or corrosive environments please contact our Apex sales staff.

WARRANTIES
Our products are supported by Bluescope Steel Limited and a full warranty is available.

LENGTHS / TRANSPORT
Apex Building Products can custom cut lengths to your requirements. Due to transport restrictions it is advisable to check with our office the maximum length.

HANDLING
Care should be taken at all times when handling Corrugated. Packs must be kept dry and stored above ground level, should the sheets become wet separate immediately and individually wipe and place in an area to dry.

COMPATIBILITY
ZINCALUME® steel sheeting is compatible with most roofing products. It is NOT recommended to use lead flashing/nails, copper or copper alloy materials with or in run-off situations.

CUTTING
Apex Building Products provides this service, however sheets may be cut using a power saw with a metal cutting blade. COLORBOND® steel sheeting must be cut with the coloured surface facing the ground. Ensure that no hot particles or debris come into contact with the COLORBOND® .

CLEAN UP
To prevent premature corrosion at the completion of each day ensure the sheeting area is cleared of all debris, including nails, rivets, rags and all cutting or drilling filings.

DELIVERY
Apex Building Products delivers to site within 1 to 2 days. To prevent any damage we require suitable arrangements to be made for unloading. Unloading by crane, ensure the load is evenly spread, if crane unavailable adequate manpower is required.